Are you confused by the following command on a Unix system?

sudo su –

I recently overheard a discussion about how exactly this was working and what password to use. Let’s break it down and see just how simple it is. Firstly, we are running the command “sudo”. The sudo command allows “standard” (ie non-root) users to run a selection (or all) of commands as a different user. Typically, and by default, sudo is used to run commands as the root user.

In the above command we have asked sudo to run “su -” as root. So, when we press enter we are prompted for a password (assuming sudo has not already recently been used). What password is this asking for? The root password or your user password or some other password? Well it is asking, as normal, for your user password. This is to check that you are who you claim. Once you authenticate as yourself, sudo checks the sudoers file for your authorisation to run the specified command. So, it checks if you are allowed to run “su -“. If so, “su -” is executed as the root user.

Given that “su -” is being run as root, the su command does not ask for a password. This is the same as if you are a root user running “su -” or “su – username”.

I hope this helps explain why “sudo su -” gives you a root prompt without knowing the root password. Sudo can do this too, if called (and authorised) as “sudo -i” (-i for interactive).

Note too that the “-” after the “su” is asking “su” to reset your user environment to that of the user you are switching to rather than just changing the effective UID. From the su man page “The optional argument – may be used to provide an environment similar to what the user would expect had the user logged in directly.”

After hearing the debate, I once again realised how many people blindly run commands without actually understanding what they are running.

A recent comment I made on Chris Wahl’s blog seems to have generated a little bit of interest, so I thought I would expand upon my thinking about this.

The comment I wrote in response to the “The New Haswell Fueled ESXi 5.5 Home Lab Build” post is included here:

Great review of your lab kit once more!

I’ve been looking at new lab kit myself and have been considering E3-1200v3 vs E5-2600v2 processors. Obviously an E5 based machine is going to be more expensive than an E3 based one. However- the really big draw for me is the fact the E5 procs can use more than 32GB of RAM.

Looking at some rough costs of 2* E3-1265Lv3 32GB X10SL7-F-0 servers vs 1* E5-2640v2 64GB X9SRH-7F server (same cases and roughly similar cooling components) it seems that the two E3 servers are more expensive.

Do you consider 32GB to still be sufficient for a home lab? And within a year or three time? I’ve not considered the cost-benefit of a E3 now and replacing it (probably similar cost) with the “latest and greatest” equivalent in 2 years time. I guess it depends on one’s expected depreciation time frame.

Who would have thought VCAP-DCD that scale-out vs scale-up questions would be relevant to one’s home lab :)

(In fairness, I was looking at having this “lab” environment also run a couple of “production” VMs for home use concurrently, so the 32GB would not be dedicated to the LAB)


Going through various lab scenarios with some VMware software prompted me to consider options as far as home lab or standalone ESXi hardware was concerned. Also, I have some ageing server hardware which still runs vSphere but no nested 64-bit VMs (yes, fairly old E54xx and E5300 CPUs, without EPT and other cool new features) which needs to be replaced.

So, my requirements when considering the hardware for a home lab were

  • modern Intel CPU (I just prefer them… my choice – no debate 🙂  ), so i7, E3-1200v2 or E5-2600v2 are all in the running
  • sufficient RAM
  • remote KVM (i.e. iLO, DRAC, etc), remote media and remote power cycle
  • cost is a factor so high end server kit is probably out
  • power consumption must be considered. Electricity is not cheap these days and less power translates on the most part to less heat too

Now all are fairly self explanatory apart from the RAM. In my particular case, I would want to have the LAB kit also run a “production” workload of a couple of home servers (currently approximately 6-8GB RAM depending on TPS and workload). This presents a couple of challenges. How to separate things out sufficiently? I could go for a “big” server with more than 32GB of RAM or have more than one “smaller” server.

In terms of efficiency and reduced complexity, a single bigger server is probably going to give more scope for expansion in the RAM department. In my experience, RAM is constrained before CPU for most situations (even more so with my VMs ). So, the 32GB limit of the i7 and E3 is definitely something to consider. The E5 gives 64GB and upward, depending on chipset, motherboard, DIMMs in use, etc.

So given I currently need about 7GB RAM for my “production” workload, that would leave 24GB (of a maxed out i7/E3 CPU) for the LAB.  Is 24GB sufficient for my lab purposes? That is a question I am still grappling with before actually purchasing any new kit.

I have managed to run a Site Recovery Manager set up under VMware Workstation on a desktop machine (i7 and 32GB RAM). The performance was “OK” but I noticed a few packets being lost every 15 minutes or so. (I started the ping tests after noticing some network connectivity issues). I attributed this packet loss to the VR traffic causing some bottleneck somewhere, but that is a post for another time.

Clearly 32GB is sufficient for many workloads. Even 8GB would be sufficient for a small two node ESXi cluster with vCenter on a minimalist Windows VM. So – what is the necessary LAB RAM size? Well, to answer that you need to look at the workload you intend to run.

Not only that, you need to factor in how long this lab needs to last and what your expansion plan would be. Do you have space for more than one machine?

So to wrap up with some take-away bullet points to consider when thinking about home/small vSphere labs:

  • 32GB “hosts” (be they ESXi to run nested ESXi and other VMs or Workstation to run nested ESXi and other VMs) are still perfectly viable for the VCP-DCV/VCAP-DCA/VCAP-DCD exams
  • 32GB “hosts” may struggle with cloud lab setups. More VMs doing more things
  • 32GB is a limit imposed by the choice of CPU – i7/E3 and cannot be expanded beyond. Worth bearing in mind if one only has space for a single machine that needs to last for a few years
  • Less RAM and “smaller” CPUs will tend to use less power, create less heat and produce less noise than bigger machines and will be more suited for home use
  • Fewer larger hosts will likely be more “home” friendly
  • More smaller hosts will likely give more lab opportunities – real FT, real DRS, real DPM
  • Scale up vs scale out – factor all options. For instance, my rough costing spreadsheet, as mentioned above, showed a single E5+64GB RAM server was cheaper than two E3 with 32GB servers
  • the i7 and E3 servers tend to be single socket while the E5 can be dual socket capable

Next time I come to replace my lab I will probably lean towards a single E5 with 64GB RAM (if RAM prices have dropped by then) on a SuperMicro motherboard.  Or a E3 with 32GB and a much smaller Intel NUC or Shuttle based box for “production” workloads.

So – yes, 32GB is currently sufficient for many home lab uses… but not all 🙂


While studying for the VMware VCAP5-DCA exam I’ve been watching a number of the ProfessionalVMware.com #vBrownBag session videos relating to the VCAP5-DCA (and also VCAP5-DCD videos previously) exams.

These are great resources and worth spending some time watching if you are planning on sitting the exams. Notice that, due to time constraints, some of the sessions ended without covering all the scheduled exam objective points. Be aware of this and ensure you cover all the topics included within the blueprints.

That said, I’ve been having some issues watching the source .mp4 files. My normal player of choice is the VLC media player. While watching some of the videos, I noticed that there were often green blocks and patches on the screen. I also noticed some sync issues between the audio and video. I tried changing some VLC settings but this did not help. I switched to the Window’s media player which helped with the green screen issues but did not fix the audio sync problem. I figured it must just be something with the recording itself.

Anyway while watching Josh Atwell’s PowerCLI episode I become very frustrated with the delays and thought I would do something about it. I re-encoded the .mp4 as a .mkv file. This resulting file played perfectly in VLC: no audio-video sync problems, slide transitions worked as expected and the video was perfectly watchable. So- it seems that the source file is OK (possibly slightly corrupted or using some “different” encode settings resulting in odd player behaviour?).

I did some Google-foo and came across UMPlayer. Using this player, the source file plays fine. So, has my default choice of VLC met its match? Only time will tell if UMPlayer can usurp VLC’s role on my PC. It turns out that UMPlayer is not up to the job! See the EDIT: below.

Now, these playback issues might be related to some video driver or other issue on my PC. In which case you can safely ignore this post – unless of course you happen to have the same issue. Anyway, UMPlayer MPC-HC is another tool to consider if having video playback issues 🙂

EDIT: Since using UMPlayer a little bit more, it started to have jittery audio. Sigh! Anyway, I switched to the tried and tested favourite (which I used previously in my tinkering with a media centre PC) of MPC-HC. This little player seems to be working flawlessly so far. I don’t know why I didn’t just use it right away yesterday!

I’ve never really appreciated just how much of a difference different thermal pastes can make. I’ve an old IBM / Lenovo ThinkPad x60. Over the years I’ve noticed it have a few thermal shutdowns during particularly CPU intensive tasks, for instance during a Linux kernel compilation or a TrueCrypt partition encryption. I’ve always just figured that “it was one of those bad designs” that could not be improved upon.

Anyway, last night it had a thermal event while applying Microsoft patches!! Hmm. I figured this was a bit much. Once before I did open it up and check the fan for lint and dust but it made no difference. I’m not sure why but last night’s shut-down annoyed me and I decided to try an improve the situation. So I decided to follow this blog post about stripping down an X60 to replace the fan. I wanted to double check the dust and lint situation and also replace the thermal paste on the CPU.

Once I undid all the screws and unattached various wires and ribbon cables I had access to the CPU cooling components. The thermal paste looked OK but it was to be replaced. I had some Arctic MX-4 on hand which I was going to use. I cleaned the CPU and heat sink as best I could using a lint free cloth and an isopropanol based cleaning liquid. I applied some new thermal paste and spread it quite thinly. I reassembled the laptop (not sure it will ever be the same!!) and somehow managed to have no screws left over!

I fired up the laptop and all looked OK. I started running Prime95 to generate load and the CPU temperature (as shown by CPUID HWMonitor) is hovering around 87 deg C. Last night I noticed it getting up to about 92-95 degrees. So, a new layer of thermal paste has dropped the CPU temperature by 5-8 degrees. More importantly, however, for me is that the laptop is running Prime95 without having any thermal events.

I know the over-clocking community has various recommendations for which thermal paste to use – but it seems it is relevant even for unmodified PCs!

vcap-dcd

Well, I managed to pass the “VMware Certified Advanced Professional – Data Center Design” (VCAP5-DCD) exam yesterday! Hurray.

First – a shout out to the various blogs which helped with the studying. Unfortunately, I don’t have a central list thereof to post here, but if I get time to collate the links I will update this post. A very useful summary of the DCD content  is contained here at http://professionalvmware.com/wp-content/uploads/2012/11/VCAP5DCD_StudyOutline.pdf.

In summary, this exam is all about general design processes with an obvious slant towards the VMware virtualisation platform. So you need to know the VMware “base” vSphere offerings along with detail of “general design principles”. This exam is probably not going to be  easy for a day-to-day vSphere admin as this is not about testing technical knowledge of the product set. Having been in a variety of architecture roles for the last number of years I can attest to this exam being a fairly good  representation of the real and thought processes necessary to go from capturing requirements through to implementation and subsequent support. If only we could follow these processes for all projects 🙂

So what to cover in preparation? Well, follow the blueprint! It may seem obvious, but for this exam you need to read all (well at least most of!!) the referenced documentation. I don’t think you need much (if any) hands-on lab time to prepare for this exam. Knowing various available options in the products can be learnt from the documentation. Saying that though, I did do some hands on exercises to reinforce the learning. Various books are incredibly useful too, including “VCAP5-DCD Official Cert Guide” by Paul McSharry, “VMware vSphere Design 2nd Ed” by Forbes Guthrie and Scott Lowe and “VMware vSphere 5 /5.1 Clustering Deep Dive” by Duncan Epping and Frank Denneman. “Mastering VMware vSphere 5” or “Mastering vSphere 5.5” (v5.5, less so for the exam I suppose) by Scott Lowe et al are great books and definitely worth reading, although can  be skipped for the DCD in my opinion if you don’t have the time.

I would point out that the exam is broadly focussed on vSphere 5.0 as opposed to 5.1/5.5. Don’t rule out any technologies  “removed” or “deprecated” by 5.1 and 5.5!

The exam itself. Well 3h45 is a long time for an exam. It flew by for me and I managed to finish with 15 minutes to spare. Somehow I made up time after the half way point which was a pleasant surprise. The 100 questions, of which I had 6 of the “Visio-like” design drawing, all covered the content from the blueprint. I don’t think there was anything which rang alarm bells as “whoa, where did that come from” – just a couple of questions where I though “drat, didn’t cover that in enough detail”. Remember, you cannot go back in this exam – so if you get a subsequent question which shows you answered something incorrectly earlier try not to let it get to you – move forward and stay focussed.

The design drawing questions are fairly straight forward if you can understand what they are trying to test.  That was the first problem I had – I struggled with a couple of them to understand what they were actually trying to get me to draw as I found some of the wording to be a little ambiguous. The rest were fairly straight forward.  Put down a few building blocks and link them together. Ah, and there is the second problem, when you are putting things into other things (for example, say a VM into an ESXi host) sometimes they would not stick and as such I was not sure if the tool “registered” the placement. Anyway – I tried not to get bogged down by this and quickly moved forward regardless. Do practise with the simulation tool on the VMware web site.

The remaining requestions are split between choose 1, choose 2 or choose 3 multiple choice and match the left column to the right column type questions. The multiple choice questions are generally the easier ones, although you need to pay attention to the exact wording and match it to phrases used in the prep material when describing the various terms. Keep an eye on the definitions in the “VCAP5-DCD Official Cert Guide” and “VMware vSphere Design 2nd Ed” books. The match the left to the right would be easy if they were all 1:1 mappings, which they are unfortunately not.  Some are 1:1 some are n:1 and others are 1:n. Tricky stuff! I consider myself pretty good at the requirements, risk, assumption and constraint stuff but some of the terms/phrases they used could be a little ambiguous – let’s hope they accept various answers. In these situations, I tried not to over think the wording and just read it at face value 🙂

So, all in all I think this is a pretty decent exam which does a good job of evaluating a candidate’s understanding of the topics at hand. I don’t think this is one of those exams where one can simply memorise a number of facts and pass.


So, I’ve been rationalising a small remote site’s network infrastructure and thought I would use some existing spare kit to try to “improve” the network  architecture. So, there was a Cisco 2800 series router and some little switch with a couple of servers plugged into it. Not much but important enough. I figured I would deploy a second 2800 and add a HWIC-D-9ESW to both 2811s. Join them with Etherchannel and set-up GLBP between the routers before the traffic headed onwards.

So a couple of obvious caveats – The Cisco 2800 (and 1800 and 3800 series too) is nearing end of supported life. This is on a budget and new kit is not an option currently.  A shiny new pair of layer three switches would have worked too – simple dual network links with some dynamic routing. Many ways to skin this fish 🙂 Anyhoo. I came across a few limitations of my plan

1) The HWIC-D-9ESW has a hard limit 0f 15 VLANs (which needs to include the VLANs 1002/1003/1004/1005, so 11 usable VLANs). Not very many if you plan on joining the ESW modules to an existing VTP domain with a few segments.

2) The HWIC ESW modules can’t do Etherchannel. So bonding a pair of links between two ESWs or between an ESW and another switch is not possible

3) Cisco do not support GLBP on SVIs with ESWs. Hmm, HSRP and VRRP are supported however. (I did setup GLBP between an SVI on each device and GLBP appeared to work. I didn’t do thorough testing though, so there are likely to be some gotchas- even though it seems to work).

Some of these limits are described in “Switch Virtual Interface for Cisco Integrated Services Routers” (PDF), “Cisco HWIC-4ESW and HWIC-D-9ESW EtherSwitch Interface Cards“, “Cisco 2800 Integrated Services Routers“.

So, long story short, two routers using HSRP with a single link between them (could use two links and have STP block one) each connected to the upstream connection. At least now the remote office has some level of network resilience.

The point of this post – in case you missed it!! – was that some “simple” features one takes for granted on “normal” Cisco kit can be lacking or missing entirely one lower end devices. Once again, it pays to completely check the vendor support matrices and feature sets. In this instance, it was quite tricky to find a definitive list of available (or disabled) features.


As I’m sure most of the active VMware users and enthusiasts are aware, vSphere 5.5 was released to the masses last weekend. I eagerly downloaded a copy and have installed it on a lab machine. I’ve not played with the full suite yet – just the ESXi 5.5 hypervisor.

The install went smoothly on the HP DL360G5 I was using. Unfortunately, the server only has 32GB RAM so I cannot test for myself that the 32GB limit for the “free” hypervisor is removed. I can confirm that under the “licensed features” heading the “Up to 8-way virtual SMP” entry is still there but the “Up to 32 GB of memory” entry is removed (when using a “freebie” license key). So that looks good 🙂 As I said, I’ve not installed the entire suite yet, only the hypervisor, so I am only using the Windows client currently. Don’t do what I did and upgrade a VM’s hardware version – you won’t be able to manage it via the Windows client – which does not support the latest features (including newer VM hardware versions).

Anyway, one of the first things I check when I install ESXi onto a machine is that the hardware status is correctly reported under the Configuration tab. Disks go bad, PSUs fail or get unplugged and fans stop spinning so I like to ensure that ESXi is reporting the server hardware health correctly. To my dismay I found that the disk health was not being reported for the P400i attached storage, after installing from the HP OEM customised ESXi 5.5 ISO. Now this is not entirely unexpected, as the HP G5 servers are not supported with ESXi 5.5. Drat!

By following the VMware Twitteratti, I’ve learnt that various ESXi 5.0 and 5.1 drivers have been successfully used on ESXi 5.5 (specifically for Realtek network cards, the drivers for which have been dropped from ESXi 5.5). So I figured I’d give it a go at using the ESXi 5.0/5.1 HP providers on this ESXi 5.5 install.

I downloaded “hp-esxi5.0uX-bundle-1.4-16.zip” from HP’s website, which is contained on the “HP ESXi Offline Bundle for VMware ESXi 5.x” page which can be navigated to from http://h18000.www1.hp.com/products/servers/software/vmware-esxi/offline_bundle.html.

This ZIP file contains a few .vib files, intended for VMware ESXi 5.0 or 5.1. The VIB we are looking for is called “hp-smx-provider-500.03.02.00.23-434156.vib”. Extract this .VIB, and upload it to your favorite datastore. Now, enable the ESXi shell (or SSH) and connect onto the ESXi host’s console. Use the following command:


esxcli software vib install -v file:///vmfs/volumes/datastore1/hp-smx-provider-500.03.02.00.23-434156.vib

and reboot the host. You should now see this software component listed under Software Components within the Health Status section. You should also see the health of the P400i and its associated storage listed. So far so good. However, on my server the HP P400i controller was showing as a yellow “Warning”. Hmm. Not sure why.

So, I figured maybe there was an incompatibility between these older HP agents and the newer versions from the HP OEM CD. So, I decided to reinstall ESXi from the plain VMware ESXi 5.5 ISO.

So, a fresh install results in fan status, temperature readings and power supply status being reported and no (as expected) P400i storage health.

So, let’s install “hp-esxi5.0uX-bundle-1.4.5-3.zip”. Yes it’s a newer version than I used above, only because I found it after I’d reinstalled the vanilla ESXi.


esxcli software vib install -d file:///vmfs/volumes/datastore/hp/hp-esxi5.0uX-bundle-1.4.5-3.zip
reboot

Hey presto! Green health status. I pulled a drive from a RAID array and the status indicated the failure and then the subsequent rebuild. Certainly seems to be a workable solution to extend the life of these perfectly serviceable lab machines 🙂

I would expect this status monitoring to work for P800 controllers too.

One can also install hp-HPUtil-esxi5.0-bundle-1.5-31.zip to get access to some HP utilities at the ESXi command line.


I’ve recently got to setup up a Shuttle XH61V for a friend. I’ve read a few posts about how they make good VMware ESXi hosts for those power conscious folk running home labs. I figured this would be a good time to see just how power hungry, or not, one of these boxes is and how well ESXi runs.

The box would end up with an Intel i3-2120 processor, 16GB RAM (2 * Crucial CT102464BF1339) and 126GB Crucial mSATA SSD (CT128M4SSD3). Quite a beefy XBMC media centre PC build from a selection of new bits and pre-owned bits! Anyhoo, while putting the components together I took some power readings along the way:


Description Power (VA) Power (W)
Power supply alone, i.e. without computer attached 20VA 2W
Power supply with bare case off 20VA 2W
Power supply with bare case on (turned on but obviously doing nothing) 24VA 3W
PSU + case + 2*8GB DIMMs (turned on but obviously doing nothing) 24VA 3W
PSU + case + CPU + 2*8GB DIMMs (idling at BIOS) 46VA 37W
PSU + case + CPU + 2*8GB DIMMs + SSD (idling at BIOS) 46VA 37W
PSU + case + CPU + 2*8GB DIMMs + SSD (switched off) 24VA 3W
Installing ESXi 32VA – 46VA
ESXi with no VMs (High Performance power option) 40VA
ESXi with no VMs (Balanced power option) 32VA 21W
ESXi with no VMs (Low power option) 32VA 21W
ESXi with three busy VMs (Balanced power option) 64VA
Windows 7 x64 SP1 idle (balanced, low, high power options) 32VA 21W
Windows 7 x64 SP1 put into sleep mode 28VA 3W


So, not too shabby when it idles. I will be interested in seeing what power a 22nm 3rd or 4th generation processor would consume while idling. It seems that this i3-2120 CPU idles at approximately 18W. During a heavy work load, the processor seems to consume approximately 21W extra for a total of roughly 40W – not quite the 65W TDP max Intel quote.

I installed it with the standard ESXi 5.1U1 installation media. No issues, once I found a suitable USB drive to USB boot from! Both onboard NICs were seen and the mSATA SSD was recognised too.

Note: It seems the included Realtek 8186 has reliability issues under VMware ESXi 5.1. The odd thing is that when I first installed ESXi 5.1 it worked fine and I was able to use to successfully. However, once I rebooted a couple of times, the NIC does not really work. It manages to get a DHCP IP address and is pingable for about 30 seconds before it drops off the network. No log entries on the host or the switch indicate the cause. Very curious!

I thought I’d write a quick post on using Linux and Quagga (zebra, ospfd and bgpd) in place of a Cisco router. Given how expensive data-centre space and power is, I thought I would evaluate using a Linux server in place of a Cisco router. A benefit of this is that it is possible to use a Linux VM to do this, if one so wishes. Now – how viable or wise this would be depends on one’s circumstances so I don’t expect everyone to agree – this raises similar debate points as the debate around the wisdom of virtualising a VMware Virtual Center server instance. Any given deployment scenario is different and the various requirements and their associated costs, benefits and risks need to be evaluated.

Onward. Technically – yes a Linux server coupled with Quagga can do a similar routing function to a Cisco router. I did a functional test in a lab where I swapped out a border BGP/OSPF speaking router with a Linux VM and Quagga. I did it in steps – first added the Linux box into the existing OSPF area 0 and checked routes were sent and received. I then added the BGP (iBGP initially) component and checked for route propagation – which worked. All was looking good. BGP and OSPF routes were being exchanged and routing (routes advertised out OSPF) was happening to a newly created test subnet  behind the Linux router.

So I did some configuration work in preparation for the eBGP peering. Added the peering /30 subnet to a VMNIC (did not up the interface in the VM nor on the host – nothing like double protection), added said subnet to the OSPF configuration (so next hop address would be available) to be propagated when the interface is up. I also added the eBGP peer’s configuration to the bgpd instance with an included “shutdown” statement.

At this point, I figured all that would be needed to switch over would be to

  • shutdown the eBGP peer on the Cisco router
  • shutdown the peering interface on the Cisco router
  • up the peering interface on the Linux router
  • no “shutdown” the eBGP peer on the Linux router

I had double checked the iBGP and eBGP configuration, including route-maps, prefix lists, etc on the Linux router so I was pretty confident of success. At this point I nearly progressed but then remembered the ACLs on the eBGP peering interface. Right, I ought to migrate them too.

Clickety click, a copy and paste and an import into fwbuilder. Hmm – some slight anomalies with the import from an IOS access-list into iptables equivalent rules. I ended up needing to go line-by-line through the ACL to ensure that the generated fwbuilder line was correct and efficient. Some tweaking of inbound/outbound/both parameters and addition of the generic “any/any both on loopback” and we looked to be in business.

Next trick is to make the ruleset stateless since we have asymmetric routing due to BGP peering… no simple in-out single default route here. So I went through and marked all the rules as “stateless”. I also ensured that the option to enable ESTABLISHED and RELATED packets was ticked in the fwbuilder gui. I pushed the ruleset to the Linux box and promptly broke the OSPF routing. No real harm – update the policy and republish the policy. EEK – with the OSPF loopback address not being announced I could not easily change the ruleset. Two options – disable the firewall rules, let OSPF catch up and then change the ruleset or point at a different IP address. I chose the former 🙂 So clickety click added OSPF/IGMP to the ruleset and pushed the rules. OSPF looks good an routing to the test subnet works too. Success.

Righto, check the firewall logs and nothing unexpected is being dropped. So I decide to press forward, following the four switch over steps above. I see the route withdrawal and subsequent announcement. Looking good. The lab has asymmetric BGP routing (two eBGP peers with different routes out each but a single route in… due to a real life transit, partial and private peering configuration setup the lab was configured to mimic) and this is what caused the next two problems which needed to be resolved.

Firstly, the routing all looked to be correct yet there was partially working connectivity. By this I mean that some hosts on the “inside” could communicate with some hosts on the outside. At first I thought I must have muddled some firewall rules, so I turned off the firewall but the problems persisted. Then I remembered the reverse path filtering on Linux…

To see the filters’ state you can use:

sysctl -a |grep -F .rp_filter

So a quick

for i in /proc/sys/net/ipv4/conf/*/rp_filter
do
    echo 0 > $i
done

got things working, but with IPTABLES still disabled. Traceroute traces looked correct and some telnet initiated connections to various ports were working as expected. I enabled the firewall rules and once more some connections broke. Hmm…

Connections going in and out of the Linux router worked, but connections being routed asymmetrically were having issues. I knew I’d enabled “ESTABLISHED” connections but this did not seem to be working. A quick investigation reveals that the definition of ESTABLISHED in Cisco IOS access-list terms is different to that in IPTABLES rule terms. In Cisco-land this means any packets with the ACK or RST flags set but in IPTABLES-land it means packets belonging to connections where both a SYN and SYN-ACK packet have been seen (i.e. IPTABLES is a state-full ESTABLISHED rather than Cisco’s stateless ESTABLISHED). I had thought I’d covered this by making the rules stateless – but apparently not.

Anyway, I created two TCP “services” – one with the ACK flag enabled and one with the RST flag enabled – and added these to the ruleset. What do you know, this mimics the Cisco “ESTABLISHED” and allowed traffic to flow as expected. I performed some more testing and announced/withdrew some routes and all seemed OK.

I then switched out the Linux box and put the Cisco back in its original place in the network.

I didn’t test the combination of OSPF and keepalived with redundant Linux routers (which would be needed for a Cisco HSRP equivalent) in this instance. I’ve used keepalived previously and it works well. I did not do any performance testing either, but expect it would certainly be sufficient to replace some of the smaller Cisco products 8xx, 18xx, 19xx, 28xx, 29xx and possibly 38xx/39xx or higher depending on the Linux router’s configuration.

Care needs to be taken when using asymmetric routing with your Linux router. rp_filter and IPTABLES both don’t cope well and rp_filter is easier to fix. IPTABLES rules will need to be carefully tuned when used with asymmetric routing. If using Linux routers, my recommendation would be to only do INPUT/OUTPUT filtering on border Linux routers and then bring traffic into a “core” firewall failover cluster combined with keepalived and conntrackd. This would allow a proper set of stateful rules to be put in place combined with a highly available firewall.

Something like this would be my recommendation as a starting point. Obviously, this is just one example of what is possible.
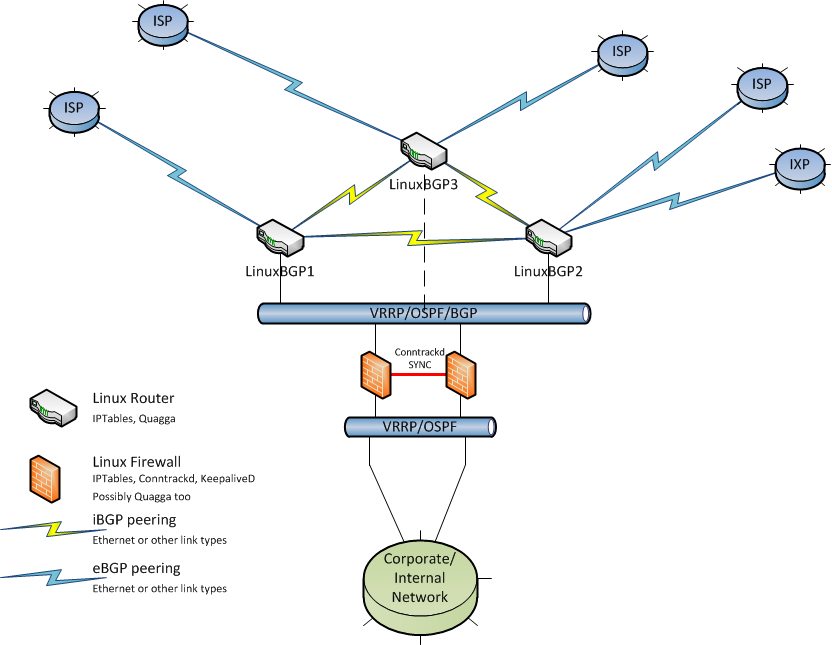
Linux-HA-network


The firewalls could be made redundant using keepalived and VRRP addresses or possibly using Quagga and advertised routes with specific preferences to ensure one firewall is primary and the other failover. As always, any redundant/HA setup should be fully tested to ensure all, or as many as practically possible, failure modes result in the desired backup state.

So – in summary – Linux, Quagga and IPTABLES could be a good fit in certain organisations or situations. There are many things to factor in when deciding on your routing platform – cost, performance, features, maintenance, skill sets, upgadeability, reuse, supportability, recoverablity, reliability, etc – however I do believe that Linux coupled with the mentioned tools offers a compelling option these days.

 

Well, yesterday I encountered a situation I’d not seen before. I started to receive mails with a subject line of “Subject: {Spam not delivered} {Spam not delivered} {Spam not delivered}” and included some occurrences of “{Spam not deli! vered}”. This was odd as it appeared that SpamAssassin and MailScanner had got into a nasty loop for some reason. I found it odd that the spam notification e-mails where themselves getting flagged as spam.

Upon further investigation, I found that there were some MBL rules getting triggered for every e-mail (excerpt from /var/log/mail.log):

Message XXXXXXXXXXXXXX from 123.123.123.123(user@domain.mail) to other.mail.domain is spam, SpamAssassin (not cached, score=35.688, required 5.1, BAYES_00 -1.90, MBL_330105 3.50, MBL_331475 3.50, MBL_337470 3.50, MBL_338477 3.50, MBL_338785 3.50, MBL_339415 3.50, MBL_339871 3.50, MBL_340040 3.50, MBL_345076 3.50, MBL_346112 3.50, MBL_349876 3.50, RP_MATCHES_RCVD -0.81, SPF_PASS -0.10)

Now, those SpamAssassin rules get downloaded every couple of hours from http://www.malware.com.br/ and stored in /var/lib/spamassassin/3.003002/10_MalwareBlockList.cf . It seems that the ruleset which was downloaded at 15h32 had bad entries and this mail thread seems to corroborate this: http://comments.gmane.org/gmane.comp.security.virus.clamav.user/38926. The mails stated bouncing at 17h56 after a MailScanner restart due to old age not long before then.

Now that I knew the cause of the problem – a bad set of signatures – I could go about fixing it. So, first thing was to download an updated set of signatures. The update luckily appeared to have the problematic signatures removed and I restarted MailScanner to activate them. I next started to trawl through the /var/log/mail.log log file to see what e-mail messages had been affected and hence blocked. A few greps later and I had a list of e-mails to sort out. A few more greps and awks and I had the messages and their recipients. So, I set about forwarding the quarantined messages on. The first one was one destined to myself. Curiously, this was flagged as spam again. Ahh – the MailScanner SpamAssassin cache. So, I stopped MailScanner, deleted /var/spool/MailScanner/incoming/SpamAssassin.cache.db and restarted MailScanner. I then resent the message in question which now arrived as expected. I then set about forwarding on the remaining messages.

So – what can we do about updates like this which cause false positives? Well not much it seems since we need regular automated updates to keep systems safe and secure from “bad things”. This is much like the situation with McAfee anti-virus updates which have caused systems to become unusable due to false positives on system files in the past. Unless we manually vet each update with a sample set of emails/systems before releasing them into production we are bound to have false positives every so often. Therein lies the question – which is less risk: “Having regular automated updates with some false positives or delayed/out of date updates with fewer false positives and lots of testing yet not being protected against the latest threats” – your choice…