Introduction
While working in a lab environment recently I wanted to vMotion a VM between two ESXi hosts. The vMotion failed, which was not entirely unexpected, due to CPU incompatibilities. These particular ESXi hosts are not in a vSphere cluster so enabling EVC (Enhanced vMotion Compatibility), which would resolve the issue, is not an option.
Attempting to vMotion a VM from host A to host B gave errors about:
- MOVBE
- 3D!Now PREFETCH and PREFETCHW

After powering the VM down, migrating the VM to host B and powering on, an attempt to vMotion from host B to host A gave errors about:
- PCID
- XSAVE
- Advanced Vector Extensions (AVX)
- Half-precision conversion instructions (F16C)
- Instructions to read and write FS and GS base registers
- XSAVE SSE State
- XSAVE YMM State

Manual VM CPUID mask configuration
As the error messages indicate, Enhanced vMotion Compatibility (EVC) would enable the vMotion to take place between mixed CPUs within a cluster. Mixing host CPU models within a vSphere cluster is generally considered bad practice and should be avoided where possible. In this instance, the hosts are not in a cluster so EVC is not even an option.
As indicated above shutting down the VM and doing a cold migration is possible. This issue only relates to the case where I want to be able to migrate running VMs between hosts containing processors with different feature sets.
For the two hosts in question, I know (based on the EVC processor support KB and Intel ARK and VMware KB pages) that the Intel “Westmere” Generation baseline ought to be the highest compatible EVC mode; one of the processors is an Intel Avoton C2750 and the other is an Intel i7-3770S Sandy Bridge. The Avoton falls into the Westmere category for EVC. We will come back to EVC later on.
I suspected it would be possible to create a custom CPU mask to enable the vMotion between these to hosts. In general, features supported by a given processor are exposed via a CPUID instruction call. By default, VMware ESXi manipulates the results of the CPUID instructions executed by a VM as part of the virtualisation process. EVC is used to further manipulate these feature bits to hide CPU features from VMs to ensure that “well behaved VMs” are able to run when migrated between hosts containing processors with different features.
In this instance, “well behaved VMs” refers to VMs running code which use the CPUID instruction to determine available features. If the guest OS or application uses the CPUID instruction to determine available processor features then, when moved via vMotion to a different host, that same set of features will be available. If a guest uses some other mechanism to determine processor feature availability (e.g. based on the processor model name) or merely assumes a given feature will be available then the VM or application may crash or have other unexpected errors.
So back to this experiment. Attempting to go from host A to host B indicated only two feature incompatibilities. I turned to the Intel developers manual (64-ia-32-architectures-software-developer-vol-2a-manual.pdf) for the detail about the CPUID instruction. CPUID called with EAX=0x80000001 results in the PREFETCHW capability being exposed at bit 8 in ECX. Similarly with EAX=0x1, the MOVBE capability is exposed at bit 22 in ECX.
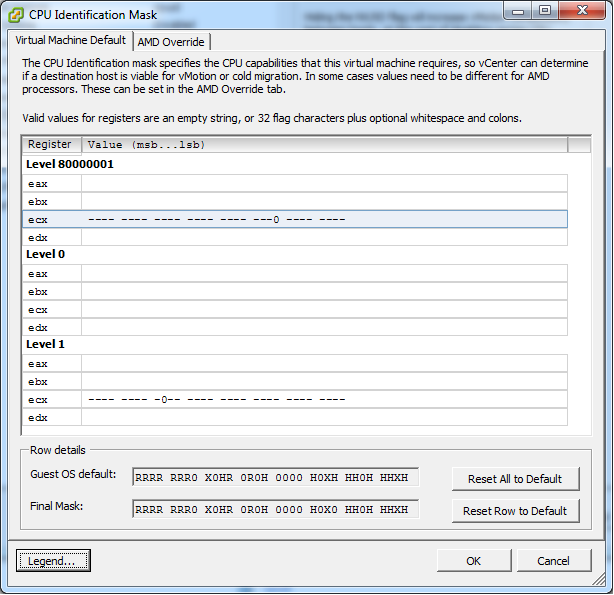
As an initial test, I did a cold migration of the VM to host A and edited the VM settings as shown below.

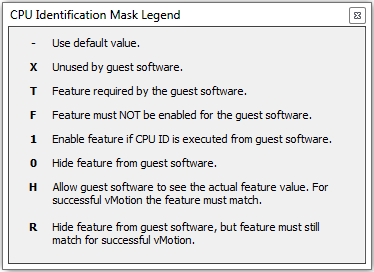
In summary, this is passing the CPUID result of the host via the above mask filter. The mask filter can hide, set or pass through a CPUID feature bit. In this instance I am hiding the two bits identified above through the use of the “0” in those bit positions. There are other options you can use as displayed in the legend.

I chose “0” rather than “R” as I need to hide the feature from the guest OS and I do not care if the destination host actually has that feature or not.
I saved this configuration and powered on the VM. I was able to successfully perform a vMotion from host A to host B. I was also able to vMotion the VM back to host A.
I performed a vMotion back to host B and powered the VM off. I then powered the VM back on on host B. I tried to vMotion to back to host A, which again failed with the same error as shown above. The reason it failed in the reverse direction is that the VM pickups up it’s masked capabilities at power on and maintains that set of capabilities until it is powered off once more. So by powering on the VM on host B, it got a different set of capabilities to when it was powered on on host A. This explains why when attempting to originally perform the vMotion we had two different sets of errors.
To get the masks to enable a vMotion from host B to host A, I took a look at the developers guide and performed some Googlefoo, I identified the CPUID bits needed to mask the unsupported features:
PCID: CPUID EAX=1, result in ECX bit 17
XSAVE: CPUID EAX=1, result in ECX bit 26
AVX: CPUID EAX=1, result in ECX bit 28
F16C: CPUID EAX=1, result in ECX bit 29

FSGSBASE: CPUID EAX=7, result in EBX bit 00

XSAVE SSE: CPUID EAX=0xd, result in EAX bit 01
XSAVE YMM: CPUID EAX=0xd, result in EAX bit 02 (YMM are 256-bit AVX registers)
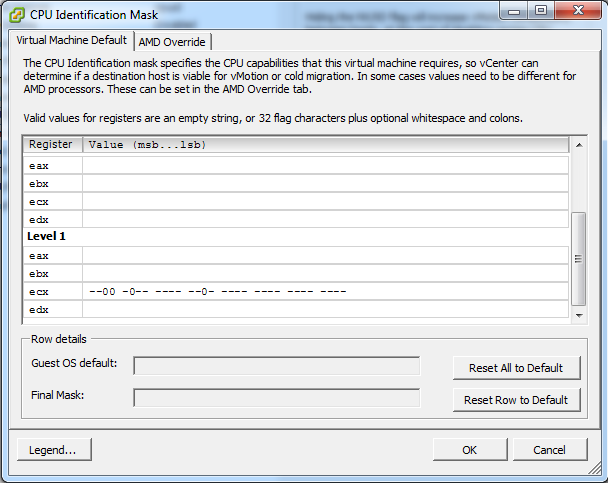
The first four are easy as the vSphere client allows one to edit the EAX=1 CPUID results. With the below configuration in place, the vMotion from host B to host A only showed the last three errors (FSGSBASE, XSAVE SSE and XSAVE YMM). This is expected as no masking had been put in place.

To put the masking in place for EAX=0x7 and EAX=0xd we need to edit the virtual machine’s .VMX file. We can do this by editing the .vmx file directly or by using the Configuration Parameters dialogue for the VM under Options/Advanced/General in the VM’s settings dialogue. The following two parameters (first one for FSGSBASE and second for the XSAVE) were added:
cpuid.7.ebx = -------------------------------0
cpuid.d.eax = -----------------------------00-
Powering on the VM succeeded, however the vMotion to host A failed with the same error about FS & GS Base registers (but the XSAVE errors were gone). Surprisingly when I checked the .vmx directly and the cpuid.7.ebx line was missing. For some reason it appears that the VI client does not save this entry. So I removed the VM from the inventory, added that line to the .VMX directly and then re-registered the VM.
I was now able to power on the VM on host B and vMotion back and forth. I was not able to do the same when the VM was powered on on host A. I needed to merge the two sets of capabilities.
At this stage we would have the following in the .vmx file:
for host A -> host B:
cpuid.80000001.ecx = "-----------------------0--------"
cpuid.1.ecx = "---------0----------------------"

for host B -> host A:
cpuid.1.ecx = "--00-0--------0-----------------"
cpuid.7.ebx = "-------------------------------0"
cpuid.d.eax = "-----------------------------00-"
(Note that there are some default entries which get added which are all dashes, and one for cpuid.80000001.edx with dashes and a single H).
We merge our two sets of lines to obtain:
cpuid.80000001.ecx = "-----------------------0--------"
cpuid.1.ecx = "--00-0---0----0-----------------"
cpuid.7.ebx = "-------------------------------0"
cpuid.d.eax = "-----------------------------00-"
At this stage we can now power on the VM on either host and migrate in either direction. Success. Using these four lines of config, we have masked the specific features which vSphere was highlighting as preventing vMotion. It has also shown how we can hide or expose specific CPUID features on a VM by VM basis.
Manual EVC Baseline Configuration
Back to EVC. The default EVC masks can be determined by creating a cluster (even without any hosts) and enabling EVC. You can then see the default masks put in place on the host by EVC. Yes, EVC puts a default mask in place on the hosts in an EVC enabled cluster. The masked off CPU features are then not exposed to the guests at power-on and are not available during vMotion compatibility checks.
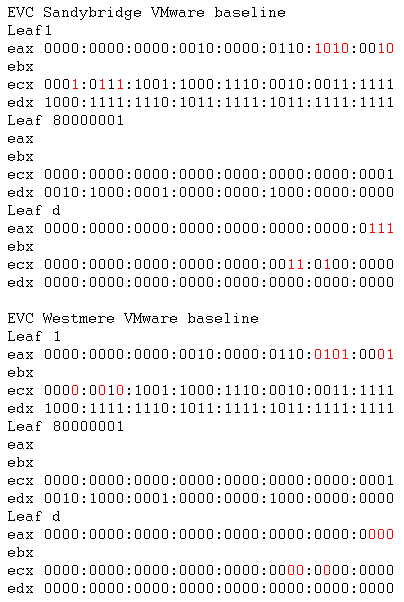
The default baselines for Westmere and Sandybridge EVC modes are shown below:

The differences are highlighted. Leaf1 (i.e. CPUID with EAX=1) EAX result relates to processor family and stepping information. The three Leaf1 ECX flags relate to AES, XSAVE and TSC-Deadline respectively. The three Leafd EAX flags are for x87, SSE and AVX XSAVE state. The three Leafd ECX flags are related to maximum size needed for the XSAVE area.
Anyway I’ve digressed. So the masks which I created above obviously only dealt with the specific differences between my two processors in question. In order to determine a generic “Westmere” compatible mask on a per VM basis we will start with VMware’s ESXi EVC masks above. The EVC masks are showing which feature bits are hidden (zeros) and which features may be passed through to guests (ones). So we can see which feature bits are hidden in a particular EVC mode. So to convert the above EVC baselines to VM CPUID masks I keep the zeros and change the ones to dashes. I selected dashes instead of ones to ensure that the default guest OS masks and host flags still take effect. We get the following for a VM for Westmere feature flags:
cpuid.80000001.ecx = "0000000000000000000000000000000-"
cpuid.80000001.edx = "00-0-000000-00000000-00000000000"
cpuid.1.ecx = "000000-0-00--000---000-000------"
cpuid.1.edx = "-000-------0-0-------0----------"
cpuid.d.eax = "00000000000000000000000000000000"
cpuid.d.ecx = "00000000000000000000000000000000"
cpuid.d.edx = "00000000000000000000000000000000"
I did not map the cpuid.1.eax flags as I did not want to mess with CPU family/stepping flags. Also, the EVC masks listed did not show the cpuid.7.ebc line I needed for the FSGSBASE feature. Sure enough, using only the 7 lines above meant I could not vMotion from host B to host A. So, adding
cpuid.7.ebx = "-------------------------------0"
to the VMX then allowed the full vMotion I was looking for. The ESXi hypervisor must alter other flags apart from only those shown on the EVC configuration page.
TL;DR
To configure a poor man’s EVC on a VM by VM basis for a Westmere feature set, add the following lines to a VM’s .VMX file.
cpuid.80000001.ecx = "0000000000000000000000000000000-"
cpuid.80000001.edx = "00-0-000000-00000000-00000000000"
cpuid.1.ecx = "000000-0-00--000---000-000------"
cpuid.1.edx = "-000-------0-0-------0----------"
cpuid.7.ebx = "-------------------------------0"
cpuid.d.eax = "00000000000000000000000000000000"
cpuid.d.ecx = "00000000000000000000000000000000"
cpuid.d.edx = "00000000000000000000000000000000"
Appendix
1
Useful thread -> https://communities.vmware.com/thread/467303
The above thread covers manipulating the guest CPUID. An interesting option is mentioned in post 9 relating to an option to enable further CPUID manipulation than is possible by default. In my tinkering above, I did not need this option.
monitor_control.enable_fullcpuid = TRUE
Note too that the vmware.log of any VM can be used to see the CPUID information of the host, as also mentioned in post 9:
As for extracting the results, you can write a program to query the CPUID function(s) of interest, or you can just look in the vmware.log file of any VM. All current VMware hypervisors log all CPUID information for both the host and the guest
Post 13, again a user jmattson (exVMware now at Google), reveals a simple way to configure the processor name visible to guests:
cpuid.brandstring = "whatever you want"
2
This thread https://communities.vmware.com/thread/503236, again involving jmattson, discusses cpuid masks – and gives an insight into how EVC masks interact with the VM cpuid masks.
3
This post https://v-reality.info/2014/08/vsphere-vm-version-impact-available-cpu-instructions/ reveals that the virtual hardware version of a given VM also plays a role in the CPUID mask a VM is given. I found this interesting as it does give us another reason to actively upgrade the hardware versions of VMs.
4
A little gem is mentioned at the bottom of https://kb.vmware.com/selfservice/microsites/search.do?language=en_US&cmd=displayKC&externalId=1029785 – it seems that IBM changed the BIOS default for some of their servers. The option was changed to enable the AES feature by default. This resulted in identical servers configured with BIOS defaults, which were added to a vSphere cluster, having two different sets of CPUID feature bits set (AES enabled on some and disabled on others) resulting in vMotions not being possible between all servers.