I thought I’d write a quick post on using Linux and Quagga (zebra, ospfd and bgpd) in place of a Cisco router. Given how expensive data-centre space and power is, I thought I would evaluate using a Linux server in place of a Cisco router. A benefit of this is that it is possible to use a Linux VM to do this, if one so wishes. Now – how viable or wise this would be depends on one’s circumstances so I don’t expect everyone to agree – this raises similar debate points as the debate around the wisdom of virtualising a VMware Virtual Center server instance. Any given deployment scenario is different and the various requirements and their associated costs, benefits and risks need to be evaluated.
Onward. Technically – yes a Linux server coupled with Quagga can do a similar routing function to a Cisco router. I did a functional test in a lab where I swapped out a border BGP/OSPF speaking router with a Linux VM and Quagga. I did it in steps – first added the Linux box into the existing OSPF area 0 and checked routes were sent and received. I then added the BGP (iBGP initially) component and checked for route propagation – which worked. All was looking good. BGP and OSPF routes were being exchanged and routing (routes advertised out OSPF) was happening to a newly created test subnet behind the Linux router.
So I did some configuration work in preparation for the eBGP peering. Added the peering /30 subnet to a VMNIC (did not up the interface in the VM nor on the host – nothing like double protection), added said subnet to the OSPF configuration (so next hop address would be available) to be propagated when the interface is up. I also added the eBGP peer’s configuration to the bgpd instance with an included “shutdown” statement.
At this point, I figured all that would be needed to switch over would be to
- shutdown the eBGP peer on the Cisco router
- shutdown the peering interface on the Cisco router
- up the peering interface on the Linux router
- no “shutdown” the eBGP peer on the Linux router
I had double checked the iBGP and eBGP configuration, including route-maps, prefix lists, etc on the Linux router so I was pretty confident of success. At this point I nearly progressed but then remembered the ACLs on the eBGP peering interface. Right, I ought to migrate them too.
Clickety click, a copy and paste and an import into fwbuilder. Hmm – some slight anomalies with the import from an IOS access-list into iptables equivalent rules. I ended up needing to go line-by-line through the ACL to ensure that the generated fwbuilder line was correct and efficient. Some tweaking of inbound/outbound/both parameters and addition of the generic “any/any both on loopback” and we looked to be in business.
Next trick is to make the ruleset stateless since we have asymmetric routing due to BGP peering… no simple in-out single default route here. So I went through and marked all the rules as “stateless”. I also ensured that the option to enable ESTABLISHED and RELATED packets was ticked in the fwbuilder gui. I pushed the ruleset to the Linux box and promptly broke the OSPF routing. No real harm – update the policy and republish the policy. EEK – with the OSPF loopback address not being announced I could not easily change the ruleset. Two options – disable the firewall rules, let OSPF catch up and then change the ruleset or point at a different IP address. I chose the former 🙂 So clickety click added OSPF/IGMP to the ruleset and pushed the rules. OSPF looks good an routing to the test subnet works too. Success.
Righto, check the firewall logs and nothing unexpected is being dropped. So I decide to press forward, following the four switch over steps above. I see the route withdrawal and subsequent announcement. Looking good. The lab has asymmetric BGP routing (two eBGP peers with different routes out each but a single route in… due to a real life transit, partial and private peering configuration setup the lab was configured to mimic) and this is what caused the next two problems which needed to be resolved.
Firstly, the routing all looked to be correct yet there was partially working connectivity. By this I mean that some hosts on the “inside” could communicate with some hosts on the outside. At first I thought I must have muddled some firewall rules, so I turned off the firewall but the problems persisted. Then I remembered the reverse path filtering on Linux…
To see the filters’ state you can use:
sysctl -a |grep -F .rp_filter
So a quick
for i in /proc/sys/net/ipv4/conf/*/rp_filter
do
    echo 0 > $i
done
got things working, but with IPTABLES still disabled. Traceroute traces looked correct and some telnet initiated connections to various ports were working as expected. I enabled the firewall rules and once more some connections broke. Hmm…
Connections going in and out of the Linux router worked, but connections being routed asymmetrically were having issues. I knew I’d enabled “ESTABLISHED” connections but this did not seem to be working. A quick investigation reveals that the definition of ESTABLISHED in Cisco IOS access-list terms is different to that in IPTABLES rule terms. In Cisco-land this means any packets with the ACK or RST flags set but in IPTABLES-land it means packets belonging to connections where both a SYN and SYN-ACK packet have been seen (i.e. IPTABLES is a state-full ESTABLISHED rather than Cisco’s stateless ESTABLISHED). I had thought I’d covered this by making the rules stateless – but apparently not.
Anyway, I created two TCP “services” – one with the ACK flag enabled and one with the RST flag enabled – and added these to the ruleset. What do you know, this mimics the Cisco “ESTABLISHED” and allowed traffic to flow as expected. I performed some more testing and announced/withdrew some routes and all seemed OK.
I then switched out the Linux box and put the Cisco back in its original place in the network.
I didn’t test the combination of OSPF and keepalived with redundant Linux routers (which would be needed for a Cisco HSRP equivalent) in this instance. I’ve used keepalived previously and it works well. I did not do any performance testing either, but expect it would certainly be sufficient to replace some of the smaller Cisco products 8xx, 18xx, 19xx, 28xx, 29xx and possibly 38xx/39xx or higher depending on the Linux router’s configuration.
Care needs to be taken when using asymmetric routing with your Linux router. rp_filter and IPTABLES both don’t cope well and rp_filter is easier to fix. IPTABLES rules will need to be carefully tuned when used with asymmetric routing. If using Linux routers, my recommendation would be to only do INPUT/OUTPUT filtering on border Linux routers and then bring traffic into a “core” firewall failover cluster combined with keepalived and conntrackd. This would allow a proper set of stateful rules to be put in place combined with a highly available firewall.
Something like this would be my recommendation as a starting point. Obviously, this is just one example of what is possible.
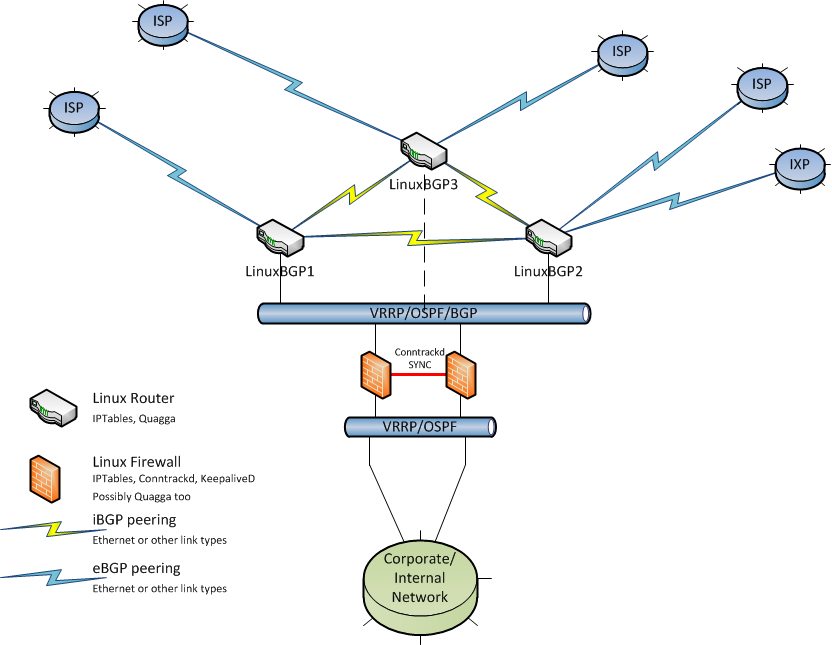
The firewalls could be made redundant using keepalived and VRRP addresses or possibly using Quagga and advertised routes with specific preferences to ensure one firewall is primary and the other failover. As always, any redundant/HA setup should be fully tested to ensure all, or as many as practically possible, failure modes result in the desired backup state.
So – in summary – Linux, Quagga and IPTABLES could be a good fit in certain organisations or situations. There are many things to factor in when deciding on your routing platform – cost, performance, features, maintenance, skill sets, upgadeability, reuse, supportability, recoverablity, reliability, etc – however I do believe that Linux coupled with the mentioned tools offers a compelling option these days.